Showing posts with label making an effort monday. Show all posts

Monday, October 10, 2011

Making An Effort Monday: Making Up for My Absence with ALL KINDS OF THINGS

In an effort to make more of the things I love -- good food, pretty things, and organized spaces -- I bring you Making An Effort Monday!  It's not a huge effort, but it's an effort nonetheless!

I know, I know. I had a rough past two weeks, what with starting back at the college after a month-long break (!) and taking on a new class. When I choose which classes to teach every quarter, I always think, Oh, wouldn't that be delightful to teach a class I have never taught before? Yeah, if by "delightful" you mean OVERWHELMING AMOUNTS OF WORK. Add that to the fact that I decided I simply MUST make a long list of changes to the class I teach all the time (Comp II), because only a few changes would not do. I was INSPIRED this quarter, dammit, and I was going to shake things up! 

PLUS, I had a whole new schedule, which was harder for me to get used to than Josephine, shockingly. Since I teach Monday nights now, I would get home, eat, stare at Josephine in the video monitor (JEREMY! Did she move? Like, did she make a "MY MOTHER ABANDONED ME!" movement?), and all of a sudden it would be midnight, and I was like, EHH, I'll do a Making An Effort Monday next week. Pinky Swear.

SO, to make up for it, I did all kinds of crazy stuff this week. First of all, I made a cell phone case because my Droid is Josephine's absolute favorite toy. Not only is it annoying to have her send texts that read "zdfngieo5tewgtflhkgna," but it is pretty embarrassing when she moves gadgets to places where I actually wanted them but had no idea how to do it myself. That and the scratches and whatnot, but mostly for the embarrassment, if I'm being honest.

I just took two minky scraps from her dinosaur and two faux leather scraps from the soles of shoes I made for Josephine (more to come on that later) and made myself a little rectangle. BOOM. Done.
 
We also had to give up the ghost on our old barricade system around our stairs (SADS). It was mostly sad because the current system was FREE, due to the kindness of my friend Heather, who lent us her play yard, and we just snapped off a few pieces and made an "L" shape around our stupid stairs that do not have a place to put a gate. When we finally realized our only option was to put a gate a few steps up, I added a GENIUS safety system in case she falls down the stairs.
Totally safe, right? To accomplish this level of safety, I cut up an old fitted sheet that had a hole in it, sewed the pieces together, and shoved it full of poly-fill. Bravo, self.

Before you call CPS, please know that she is a regular stairs champion these days, especially since my mother taught her how to push herself down the stairs on her stomach, which quickly escalated to her sliding down on her butt while she laughed hysterically. Also, I was pretty convinced that once she climbed up there and realized she couldn't get past this gate (unlike our old "system"), she would get bored and stay off and the stairs, and I was SO RIGHT. She went up a few times the first day, like once the second, and she hasn't been up since. WINNING.
This project also taught me that the only reason MoJo had shunned all previous cat beds we offered him was because they were not large enough for his highness. Oh well, a cheap project that serves TWO purposes. Bonus.

I also had plans to try a new recipe from The Pioneer Woman this week, but as I was reviewing the recipe at 5 PM, I realized I was missing a crucial ingredient. It would have taken half an hour to go get the missing ingredient and get back home, which would have put dinner a half an hour late, and Josephine is rather fond of her evening routine. That is to say, if her dinner is late, she screams like a banshee. 

Since I already had boneless skinless chicken breasts defrosted, I improvised this little ditty, which garnered rave reviews from Jeremy (and my stomach). I like to call this number "There's a Lasagna in My Chicken!" Here's the recipe:

There's a Lasagna in My Chicken!

Ingredients:
Boneless skinless chicken breasts, defrosted 
Marinara 
Low-fat cottage cheese 
Low-fat shredded mozzarella 
Frozen spinach, cooked and squeezed 
Fresh basil

Directions:
1. Preheat oven to 425 degrees F
2. Lay your chicken breasts out, cover with saran wrap, and pound with the flat side of a meat tenderizer until desired thinness (I make mine as thin as possible).
3. Spoon a thin layer of marinara over the chicken, followed by a thin layer of cottage cheese (maybe a little less than 2 Tablespoons?), a layer of spinach (as much or as little as you want, depending on your preferences and how packed the chicken already is; if there is too much inside, it will be impossible to roll up), and a sprinkling of mozzarella.
4. Roll those suckers up as tight as possible, place in a baking dish ("seam" down), and top with a tiny dollop of marinara and a sprinkle of mozzarella (some people apparently tie things like this up with string to keep them together, but I am too lazy and easily annoyed to do so). I added a sprinkling of fresh basil I had given a rough chop, but that's optional, and dried basil would do the trick as well.
5. Bake for 20 minutes (give or take, depending on how thick or thin your chicken is -- just stick a knife in to make sure there is no pink and the juices run clear), and serve!
I would have given you a close-up shot, but I dropped my chicken on top of Jeremy's while trying to get them on plates, and they got all not-pretty. 

I opted for a side of whole grain pasta and a side salad, while Jeremy opted for a large piece of chicken and a large serving of pasta. I can only do so much, people.

And finally ... the pièce de résistance ... I made Josephine the dress I have had in my head for more months than I care to admit.
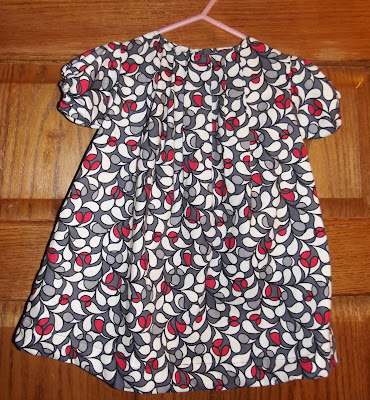

It has pleats, and sleeves (puffy sleeves at that!), and buttons! I have never done ANY of that before, and I did it ALL!


I call it the Pleats and Puffs dress. I took pictures of every step, so I could make a tutorial for this dress, but I'm not gonna lie -- that takes a L-O-N-G time, so I figured first I would see if anyone was interested. Leave a comment if you would want a tutorial on how I made this dress, and I will get crackin'.

That's it, folks. Brag about your efforts in the comments! Compliment me on my mighty feats of awesomeness! Stifle the urge to tell me my "gate-halfway-up-the-stairs-pillow-at-the-bottom" system is unsafe!

Happy Monday!

Monday, September 12, 2011

Making an Effort Monday: Mexicali Casserole

In an effort to make more of the things I love -- good food, pretty things, and organized spaces -- I bring you Making An Effort Monday!  It's not a huge effort, but it's an effort nonetheless!

I've got a good recipe for you folks today. I decided to try this recipe based on the picture and name alone, and thankfully, I wasn't disappointed.

I was a little nervous at the lack of ingredients once I perused the recipe (as I was about to make it. ... heh.), so I added some spices to give it a little more zing, but other than that, the few simple ingredients actually did a fantastic job of making a meal. As usual, I also substituted ground turkey for ground beef, and made a few other changes to the original recipe. Without further ado, I give you:


Mexicali Casserole

Ingredients:
1 lb. ground turkey
(Optional) Spices for meat: roughly 1/2 Tablespoon of chili powder; 1/4 teaspoon cumin, cilantro, and oregano; and generous dashes of black pepper, cayenne pepper, and salt
1 15-oz. can diced tomatoes with green chiles
1 1/2 cups whole kernel corn
1/2 cup Mexican-blend grated cheese
1/2 cup all-purpose flour
1/2 cup yellow cornmeal
2 Tablespoons sugar
1 1/4 teaspoons baking powder
1 egg, beaten
2/3 cups milk
2 Tablespoons cooking oil
1/2 teaspoon salt

Directions:
1.  Preheat oven to 350 degrees Fahrenheit. Add cumin, chili powder, black pepper, cayenne pepper, salt, cilantro, and oregano to the ground turkey (optional) and brown the turkey. Stir in undrained tomatoes and corn; heat through. Transfer to greased 2-quart baking dish.
2.  In a medium bowl, combine flour, cornmeal, sugar, baking powder, and 1/2 teaspoon salt. Stir in beaten egg, milk, and oil. Spread evenly over meat/tomato/corn mixture. Sprinkle with cheese.
3.  Bake, uncovered, for 30 minutes or until cornbread topping is set. Let sit 5 minutes before serving.
Delish!

I added fresh tomato, fresh jalapeno, and sour cream to mine, but that's just because I love toppings and love having the problem of having too many fresh tomatoes in the house (ahhh ... summer).  Jeremy said it is delicious without the toppings and a "nice combination of spicy and sweet." Well said, husband.

Please do enjoy your Monday, and enjoy the dish if you make it yourself. If you made any efforts this week, feel free to brag about them in the comments! (Hardly anyone ever does this, and it would make my bitter heart swell three sizes if you did. Consider it?)

Monday, August 29, 2011

Making An Effort Monday: Organizing, Cooking, and Sewing, Oh My!

In an effort to make more of the things I love -- good food, pretty things, and organized spaces -- I bring you Making An Effort Monday!  It's not a huge effort, but it's an effort nonetheless!


It was an effort-filled week my friends, let me tell you.  Of all the efforts this week, the three that topped the charts were taking over the office closet for my crafts (!), trying out a new recipe, and a sewing project.


Okay, so the closet might not be all that much to look at, considering the awesome organized spaces I see, but before it became my craft closet, it was the official "dumping ground" in our house, and looked a lot like a closet you would see on Hoarders. 

Now it looks like THIS:
The cleaning was spurred by a generous donation of fabric from my mom, which made me sort and organize all my fabric.  My stash now looks like this:

Makes me tear up every time I see it.


I also tried a new recipe, which earned RAVE reviews.  However, my camera was being wonky, and I didn't get a picture.  I'll give you the one from the original source, but please know they look so much better in real life.  Yummmmm.


I found this recipe on Pinterest via M3.  Here is the original recipe from Chicho's Kitchen:


Parmesan Roasted Potatoes
Ingredients:
4 medium red potatoes
2 tbsp olive oil
1/3 cup Parmesan cheese
1 tsp garlic powder
1 tsp paprika
salt and pepper to taste

1.  Preheat the oven to 400ºF (200ºC). Cut the potatoes in wedges.
2.  In a small bowl, combine the Parmesan, garlic, and paprika and set aside. Next, toss the potatoes and oil together in a mixing bowl then add the bowl of cheese and seasonings and stir to coat.
3.  Arrange them on a cookie sheet in a single layer.
4.  Bake for about 30-35 minutes then remove from oven and turn over all the potatoes. Bake for another few minutes until crispy and golden.

I made a few changes to this.  I used more parm (maybe an extra quarter cup), more Paprika, (probably another 1/2 tsp.), I added some Cayenne Pepper (probably about a 1/4 tsp.) and used garlic salt instead of garlic powder and salt to taste.  

I cannot say yum enough about this recipe.  My only regret is I used up the rest of our parm making this recipe, because I would have made it every night this week.  When I go to the store on Wednesday, you better believe I will be getting lots of potatoes and Parmesan cheese!

Finally, my organized craft closet inspired me to whip up a little sewing project last night after Josephine went to sleep.  I was going to make Josephine some shoes, but looking at the patterns I found, I decided I wanted to find a different material for the soles than I already had on hand, so I used some lovely fabric I found on clearance a few months ago to make a purse!  Something for myself?  Shocking.

I followed the Buttercup Bag pattern from Made By Rae, and (aside from a few minor things), I am very happy with the results.  

 Lovely bag!
Lovely little pleats!
Not-so-lovely interior fraying ... but lovely little pocket!

The pattern was relatively easy to follow, which is why I was pretty disappointed that I must have made a mistake at the end (even though I tried so dang hard) and the seam at the top on the inside is all unfinished and fraying.  Yuck.  Also, if I had been a more skilled sewer, I would have looked at the pattern and realized it would be better to have put the strap in between the purse exterior and the lining instead of just sewing it on at the end like the pattern calls for.

The purse is small (because I am bad at estimating what the end size will be from looking at patterns online), but I am sure I could enlarge the pattern, put some interface on to sturdy up the purse, and try it again. At any rate, I am proud of being able to whip this up in an hour.  It even has a pocket! :)

Brag about your efforts in the comments, and if you try the purse pattern, try not to brag to me about how you didn't make the same mistake I did. 

Monday, August 22, 2011

Making an Effort Monday: Felt Food

In an effort to make more of the things I love -- good food, pretty things, and organized spaces -- I bring you Making An Effort Monday!  It's not a huge effort, but it's an effort nonetheless!


Josephine got an adorable shopping cart for her birthday, and while her "bay" looks smashing in it, I thought she needed some food to put in that cart.  So, for a few days last week I went a little felt food crazy.  I found a couple of tutorials and made some up along the way, and this is what I came up with.


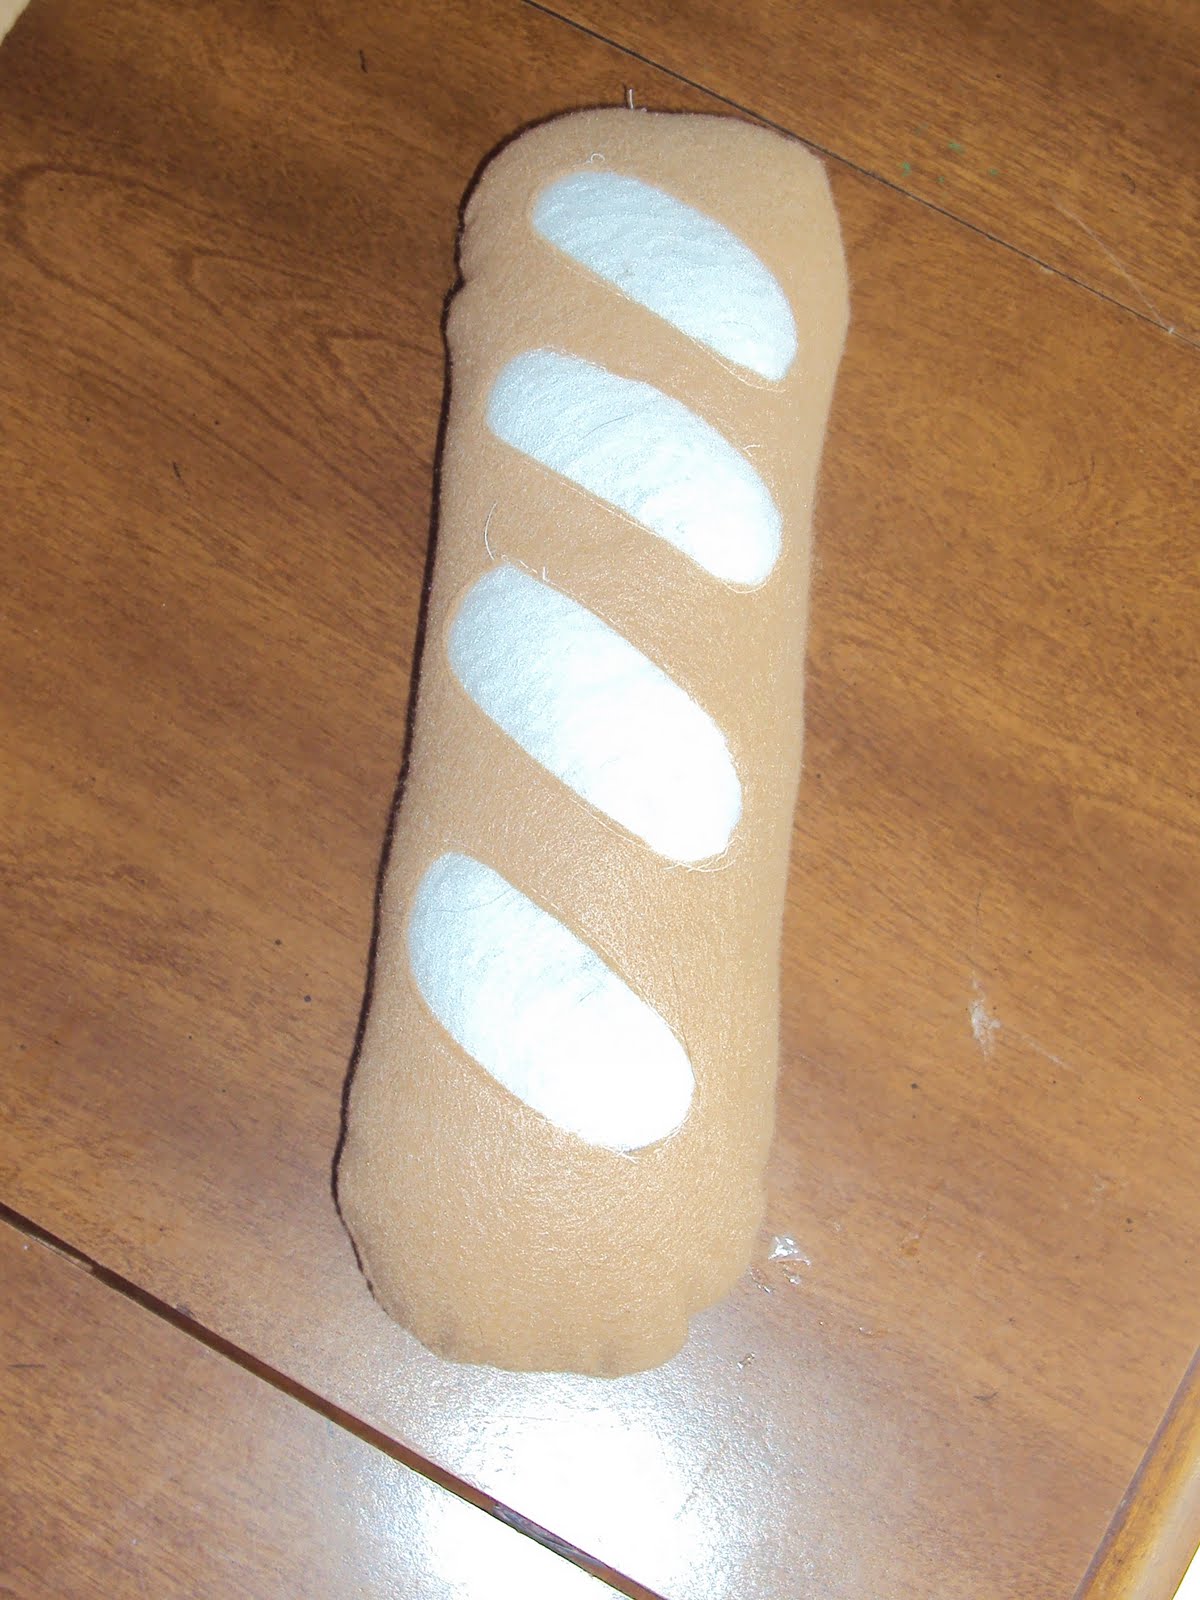
FRENCH BREAD
The first thing I decided to make was a loaf of french bread because it seemed easy, and it was.  All I did was:

1.  Take a sheet of light brown felt, cut it in half, and rounded off the ends of those long pieces to make the shape of the loaf.
2.  Fold a little piece in half near the middle to make a snip, then cut oblong shapes out of the loaf on an angle, like so:
3.  Next, I cut little pieces of white felt, just enough to cover those holes and sew in place:
4.  I put the right sides facing in, pinned, sewed, leaving a few inches open, flipped inside out, stuffed, and sewed up the hole.  Done!
She loves it.  Can you tell?

PEAR
Next I tried a pear.  I followed the tutorial HERE, which boils down to:

1.  Cutting out two pieces like this and a little leaf.
2.  Sewing everything together except for the bottom (the flat part) with the leaf between the two pieces of felt facing in.
3.  Flipping it right side out, stuffing the pear with poly-fill and putting a running stitch all the way around the opening.
4.  Pulling the thread so the fabric gathers, criss-crossing a few extra stitches, and BAM.
I gotta say, the idea this blogger had for the running stitch to gather the bottom is a great one.  That is definitely a strategy I will utilize with future felt food.  However, the shape she used left me with a rather large and shapeless pear.  No worries, Josephine loves it anyway!

CARROT
Next, I tried carrots, and I've gotta say, this ended up being my favorite.  I went with the basic ideas I got from the pear tutorial, and here is how I did it:

1.  Cut a large triangle out of orange felt.
2.  Took three strings of orange thread (you could obviously use embroidery floss, but I already had the thread, so why buy something new?) and ran a few lines of thread across the triangle, like so:
front 
back
3.  I sewed the long sides of the triangle together with the right sides facing in and flipped it right-side out.
4.  Stuffed the carrot and did a running stitch around the opening (just like with the pear).
5.  Cut some sort of shape out of dark green felt for the foliage atop the carrot.  I just cut something that looked leafy and called it a day. 
6.  Then, I stuffed the ends inside with the poly-fill, pulled the stitches tight and sewed it closed, and done!

CORN ON THE COB
Truth be told, I think this ear of corn is really cute, but I wouldn't recommend the process I used.  Unless, of course you have a great deal of time on your hands and a need to get very frustrated. Therefore, I will be brief.  I followed THIS tutorial and ...

1.  Weaved together strips of yellow to make three shapes like the ones below, cut out yellow to go behind the weaved pieces (this was not in the tutorial, but no matter how tightly I weaved, I knew poly-fill would poke through).
2.  Sewed the pieces together, right sides in.
 3.  Turned it inside out, stuffed it, did a running stitch around the opening, pulled it tight, and sewed it shut.
4.  Cut some dark green felt into a husk shape.  
Best directions ever, right?  Cute corn, though:
 

I'm currently working on a large number of strawberries, so get excited for that tutorial in the future.

If you have questions about any of the felt food, be sure to ask, and if you make any yourself, send me a picture and I will post it.

Happy Monday!  Brag about your efforts in the comments!  

Monday, August 15, 2011

Making an Effort Monday: Feta-Stuffed Chicken


In an effort to make more of the things I love -- good food, pretty things, and organized spaces -- I bring you Making An Effort Monday!  It's not a huge effort, but it's an effort nonetheless!


A new recipe!  Are you so excited you might pee a little?  Don't be ashamed.  According to Whoopi Goldberg, Cleopatra did it too!


ANYdoodle, I decided I wanted feta inside a chicken breast.  Because who doesn't?  I was in the store, trying to decide what should also go inside said chicken breast when I saw sun-dried tomatoes and realized that might work, but I had no clue, really, because I have never had them.  Is that weird?  Jeremy said it was weird.  Plus, I LURVE tomatoes, so I decided to go for it.  This all resulted in a super-easy chicken recipe.  If you have defrosted chicken and three more ingredients, it takes five minutes to whip together.  Here's what I did:


1.  Sliced a chicken breast in half.
2.  Flopped it open and put a tiny bit of Greek dressing on each side, followed by feta and sun-dried tomatoes.
3.  Closed it up like a sub sandwich, shook  a little salt and pepper on top, threw it in the oven for about 25 minutes at 450 (or until the juices run clear and/or your meat thermometer says it's okay), and DONE.

It was good despite the fact that I did not have the imagination or energy to make Greek side dishes and learning I actually do NOT care for sun-dried tomatoes.  Huh.  Who knew?  Even though I did not enjoy that flavor, the chicken was good and simple to make.


Happy Monday!  If you made an effort this week, be sure to share it in the comments!
Related Posts Plugin for WordPress, Blogger...